Sunday, May 27, 2012

An adorable, easy way to keep that meaningful receiving blanket forever - and in a beautiful home decor manner! 
A receiving blanket upcycle tutorial! Great gift for mothers :)!

This is what we are making today!

Let's face it. If anyone here is a mother.. then you know the importance of baby's first outfit. Or baby's receiving blanket that he was first wrapped in...and the baby blanket! The super soft, delicate baby blanket.  They are an amazing representation of the little man (or lady!) your child used the be. The memories that go along with it are priceless... and admittedly, it is hard to part ways with those pieces of someone to important in your life.

I have seen many framed baby outfits and articles around the web.. but they are just NOT my style.  So I began to ponder how I could use them in my home without drawing too much attention as, lets face it, those pieces are important to my family only.

After many failed painting attempts, I was really racking my brain trying to decide what to do with a pair of kohl's framed artwork I had picked up at a garage sale for $3 each (originally $39.99 each!).  I gutted the insides completely. Sorry whomever painted the pictures.. I just really loved the frames!

Then my husband said the smartest thing "why do you do like others on pinterest have and use fabric in the back?"

DUH!
 (This is the original frame and artwork)

Then it all came together. Those receiving blankets I sadly placed in our donation bin - just became my fabric for the artwork in our hallway!! I had two photos laying around and decided to use them.  Your size color and pictures depends on your taste ;).

What you need:
A picture frame
A piece of cardboard that fits perfectly in the frame (I used the piece that came inside of it originally)
A receiving blanket in any print
A photo of your size and picking (preferably of the little one wrapped in said blanket!)
Decorations to trim the photo with (using pieces of the baby blanket is a GREAT idea! Or even pieces of baby's clothing, lace hairbands, etc.)
Glue. Hot glue would work here. I used Allene's All purpose fabric glue.
 (My receiving blanket I used. I decided to do away with the little elephant. )
Using the cardboard that fits in the frame, place the receiving blanket under it, with the backside facing use. Roughly cut out the shape of the cardboard (using it as a guide), leaving space to glue it to the cardboard.
 No need to be exact here. Nobody will see the backside.
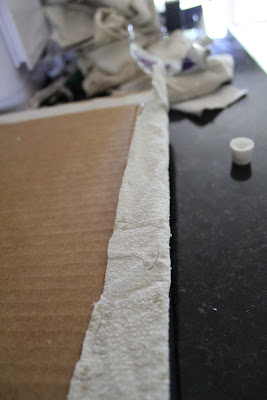
 Using your glue, making a thick line and firmly push fabric edge into the glue. As you go around the edges, 'tug' on the fabric to give it a firm, taunt fit.  
 There really is no right or wrong way to do this.  Just as long as you are able to remove wrikles you will be fine. Your finished product should look something like this:

 Now take your picture, and cut it down to size to fit. I had a 12x12 cardboard, so I decided to make the photo 4x4. A bigger photo would work just fine - it all depends on the size of the frame you use!
Next I measured to center it perfectly in the middle of the blanket.  
 Then I added a dab of glue to each corner to hold it down to the fabric.
 Once the picture is firmly in place, you can begin to add your embellishments. I ended up using some vintage lace I cut from a bed skirt my MIL and left me. 
I measured out the panels and cut accordingly.  Next, apply a strip on glue half on the fabric, and half on the actual picture.  
 Then we attach the pieces, firm placing and pulling the fabric to make it a straight line. 

 All the side pieces are now attached.. but they are overlapping. I had to cut out square pieces to get the fabric to lay properly. 

 Next, apply glue to the backside of the lace, or straight to the fabric to get everything to lay flat. 
 I then cut out corner pieces of remaining lace to complete the look. 
 Place glue on the fabric.. in the corner where you plan to lay the corner lace piece. 
 Attach! Adding more glue to areas that seem to not lay flat. 
 
 The finished look!
 This project is what you make of it! The options or endless! Use your imagination, make it personal and make it count.  These are memories you want forever.. so hold on to them in a secret way. One that only YOU will know.  


Sincerely,
Kristin

Friday, May 25, 2012

My name is Kristin and I am addicted to shopping.


No, not your average 'Macys - One Day Sale!' type of shopping. I am addicted to the thrill of the find. The thrill of the unknown. The musky smell of clothes long forgotten.  I am addicted to Thrift Store Shopping.

Anybody who knows me knows that I maybe buy new clothing from a store, oh, twice a year at this rate.  I discovered thrift store shopping before my son was born - mostly just to buy his clothing... then I realized that people were kind enough to donate some of the most amazing brand items in MY size.. and MY style. Wow. The thrill was amazing. An almost literal high.  The first thing I do when anyone comes to visit me? Ask if they want to thrift shop! I have gotten my mother addicted, my best friend - among many others! 


(A sample of a pile of clothing I purchased from a thrift store. $2 shoes, $3 shorts $2 skirt, and a $4 american eagle skirt.)

Now, I take great pride when people ask me "Where did you get that!?" and I can reply "A Thrift Store! It was $x.xx new with tags! Awesome, right!?"

To bring my love and get others in this downward economy to do the same, here it is. My Thrift Store Bible. Read it closely. Soak it in. Make it yours. GO SHOP!!!


(A heavy duty Talbots Jacket. Size large. Purchased for $1.50 - originally over $250 - She's for sale!!)   


First things first. You need to know the difference between a thrift shop, a resale shop, and a consignment shop: 

(wording after the red areas is blissfully borrowed from this page: 


 Consignment shops accept merchandise on a consignment basis, paying owners a percentage when and if the items are sold. Most pay consignors from 40 to 60% of the selling price, and have a policy of displaying goods for anywhere from 60 to 90 days, although there is a wide range of policies. Some consignment shops also purchase additional items outright from individual owners and/or wholesalers.

A thrift shop is run by a Not For Profit organization to raise money to fund their charitable causes. These range from The Salvation Army/ Goodwill type to the small volunteer-run church thrift shops. These can obtain goods through outright donation or they could operate on a consignment basis. Some thrifts do both.

A resale store is the phrase most often used for shops which buy their merchandise outright from individual owners.


(A Sarah Luna Dress - Purchased for $7 - Retailed over $250!, Charlotte Russe shoes - $1 at a thrift store on a military base)

From my experience - the majority of the best priced items are going to be found at a thrift store. Why? Because they are donation. They were free to start - and the price will be priced for a quick sale for the non-profit. They aren't scanning for brand names (and to be honest, the majority of them would not know an extremely valuable item when they see it)!  But, you will have to do some digging. You maybe find one or two items in a whole store out of thousands, but you will walk out of their will one heck of a deal - and feel proud of yourself for finding it!


(This Members Only peplum motorcycle jacket was purchased from a Resale Store (wicked Thrift) foor $20. She was too pretty to leave.)

As for consignment and resale shops - the owners have a right to be more picky. They know labels, they know brands. The only plus side in my opinion, is that you will find a store full of items they are in great condition, beautiful, and ready to be bought. But the markup, is insane. I have seen wet seal tops selling for $15 - which I would never pay for an unused item. You find the occasional score (I once bought a rare 1990's Coach bag for $30. That would not have mattered except it was in a rare navy color - I sold it on e-bay for $150) - or specific item on your lust list at a discount - but for your run of the mill 'let's go treasure shopping!' - this is not your place. 


 (Authentic 1970's Christian Dior Sunglasses. GREAT condition. Purchased for $18 - Soon to be placed on e-bay for $150!)


Now, for my thrifting tips:

The day of the week matters. For instance, most people do spring cleaning on my weekend. My local thrift shops are all church run, therefore they are closed on Sunday and Mondays (it's a shore town, thing).  The Tuesday they come back they have to empty the donation boxes and get to work. So a Tuesday, or early Wednesday morning is the best for my area.


Also, most thrift stores have a certain day of the week they will do a steep discount. In my area, the majority do a Wednesday discount (aka, Wacky Wednesday!). Three stores I know if do an additional 50% off of all women's clothing and accessories on this day, and another I know of allows you to draw from a bucket of paper slips to get in between 10 - 100% off of your purchase! Call ahead of time and ask if their is a certain discount day - and visit ONLY that day. I know that most goodwill's even have a military discount day!


a
(Stuart Weitzman Shoes - Purchased for 5 whole bucks. J'adore!!!)
Get on the mailing/e-mail list. Many thrift stores have one! You will know about end of season clearance ahead of time (so mark your calendar! They are worth it!) and any specials/coupons they are offering! One specific store, my favorite, had a one year anniversary sale where you could fill a brown paper bags with as many items as you could fit from the store for $5!! The same day, I ended up with an Escada Black label suit for $1 because a single button fell off (but was attached with a pin!) - that I sewed back on... and sold for about $200 on e-bay.  

Volunteer!! It is a great way to give back - but to also get first grabs at items and a steep volunteer discount! 


(purchased this pleated pink maxi skirt for $1, and the top for $0.50)
Search high, and search low! Thing's are placed in as many corners as the store has.  Many times, there can be bins under the racks. Ask if you are allowed to search through them.. and take your pick! Most people are too shy to ask. But you aren't, right? ;).

If you have a smart phone - BRING IT WITH YOU! Use the google shopping tab to search out specific items you are considering buying to make sure you are getting a deal. I have on several occasions felt I was picking up a huge name brand item - only to find out it was so and so for SEARS, or so and so for K-MART.. big letdown.

If you LOVE goodwill - Keep this in mind. In some locations they have a shopper reward card (much like the one at your grocery store) and can earn money to use towards future purchases. Ask your cashier if it is available at your store. Also, find out if you have a goodwill distribution center near you! you can actually buy clothing BY THE POUND!!!! Amazing, right!? No tags. Just poundage. We have one in Boston that I am dying to visit :D


(Purchased this skirt for $1 as well! The shoes area real leather.. had retail tags of $160 - scored for $15 on e-bay ;) )

For finding your perfect thrift store:
The majority of my favorites are church run thrift shops.  My thinking for this may not please everyone... but their are some people who really, really like to give back to the church. And my, oh, my do they.  Their charity = my closet.  Church thrift stores in ritzy parts of town are a hugeeeee plus.  Actually, most thrift stores in ritzy areas are worth your time.

Thrift Store Locator:
http://www.thethriftshopper.com/

Here are some great resources for you:
How to Shop Resale:
http://www.tgtbt.com/consumer.htm

I hope this helps. If I think of anything else, I will post it in the future. Until then, ask questions - I am more than happy to help!

Sincerely,
Kristin

Thursday, May 24, 2012


All. About. Vinegar.

It is now 5:45 am. I have been up since 4:20 am.  
Two loads of laundry have been done - with another two pending.
The stairs are spotless.
The house smells relentlessly like glade fragrance mist.
Brown rice is on the stove cooking.
And I - I am miserable.

My husband and I had a very, very rude awakening this morning - In the form of well, dog poop.  Our Bernese Mountain Dog Puppy, Samson (8 Months), somehow decided that instead of waking us up to let us know he had a bad case of the runs - it was a MUCH better idea to jump in bed with us and just let things, um, happen naturally.

So we awake to soaked sheets, stained carpets, soiled floors and an unbearable stench.  This case was SO bad that he literally could not hold it all the way from upstairs, down the stairs, through the kitchen, the sun room, and over the back deck. I simply could not believe my eyes. 

GROSS, right!? SO gross.  

Now comes to humor. While I strip the sheets off the bed, and wrap everything tightly to bring to the laundry room... I notice it soaked through the sheets and on to our memory foam mattress. Great, we aren't going back to bed now. But how to clean it? We are out of carpet cleaner (plus I HATE the smell). Then it occurred to me - duh! Vinegar! I come downstairs to find my hubby cleaning the stairs and floors with my trusty vinegar solution. It is my baby. I use it on literally everything. And a fight ensues. It was probably the stupidest and funniest fight ever - I wanted my vinegar for the bed and carpet and he wanted it for the floors!. You would think it was liquid gold the way we were sleepily arguing over it:

"I need to vinegar for the bed and carpet"
"well, I need it for the floors!"
"You can clean the floors with anything - I need it for the bed before the smell sets in!"
"Go make another bottle, this one is mine! I need it!"
"I don't want another bottle - I want THAT one - it's premixed!"


After waiting the what seemed like an hour (really was three minutes) for him to finish, I went to clean. And what do you know - It worked better than anything I could have ever imagined. 

And the first thing I could think of to do while the dog sits  miserable on the back deck, the husband is crashed out on the couch - and I prepare to make Samson some 'binding' brown rice and egg breakfast - blog about my love for vinegar.

I switched almost completely to baking soda and vinegar products a month and a half ago. It's worked like a dream. here are the best uses - and recipes for using it to clean your whole home, use in the laundry, use for outside.. etc. etc. Thanks to pinterest, I will never go back to strong smelling, cancer causing - dangerous chemicals. I can use this on everything and no worry about what chemicals my child may put in his mouth by licking one of the million things he licks.

My Basic Solution in a spray bottle for everything (including my granite counters and wood floors!) is:

1 Part White Distilled Vinegar
1 Part Tap Water
1 Tablespoon Dish Soap

Shake, Spray, use!
If the smell is too strong, add a few drops of an essential oil of your choosing. Lavender is a great one!

I even added some to a specific shampoo container to use for clarifying my hair! I can't believe how shiny my hair is now!

For 101 uses (plus more in the comment section!) see here:
http://www.simpleorganizedliving.com/2012/03/05/101-more-uses-for-vinegar/

Sincerely,
Kristin


Monday, May 21, 2012

Recycle, Reduce, Reuse.  
How to make a DIY Children's apron from old clothing. 

That is a very important motto in our house. From recycling everything down to the envelopes mail arrives in- to refusing to throw out old clothing - no matter how stained.  I have a closet full of clothing in various sizes, patterns, etc. that I have picked up over time from thrift store clearance racks... as well as clothing I have stained myself. It happens more often than you think.

I have been dying to find ways to use these items. I have made hair items, pillows, and new clothing items from them. But what to do with the awkward stained/ripped items!?  Then It hit me. APRONS.  Not just any aprons - Children's Aprons!!! My best friend has the most adorable little girl.. and I have been dying to make her something - this was my chance!

My first try? Not such a good one. I made the top too long.  And the stitching was horrible.  I literally have ZERO training in how to sew. I picked it up about 2 months ago -and have been trying since... it has been coming to me over time. But the art of getting a straight even line is the death of me. 


Any who - I tried again. Um, yes Look at this vintage style Beauty!? Which came from a dress (the white lace portions) and a wetseal shirt with a stain (by me!) on the front.  And look at this Tres Adorable photo of my best friends little girl rocking it!?

After finally figuring it out - here you go. My first try at a step by step how to sew something blah blah blah tutorial.  Here is a photo of the before and after of what I am about to show you how to make: 


 Please, again, keep in mind - No formal training. Anyone who is proficient in sewing may cringe at this project. But, what works for me - works for me!   Also, steps may very based off of the clothing item you picked. Shirts are easiest!

I began by ripping all of the seams from the straps, tie belt, buttons, etc. Set aside.


 Next, I ripped the seams on the sides of the shirt to make it into two separate peices.


 After it was all said and done, I ironed all of the pieces for easier sewing and appearance.  Then I laid all of the pieces together for a visual idea of how to sew it together again. 
 Next, I folded the front piece perfectly in half and drew a line for where I wanted to cut.  I tried to visualize it as a square for the top part of the apron, and a rectangle for anything below the tie belt. Then, I cut!
 Here is how she looks after cutting the 'square' out.  You can easily measure from shoulder to waist of whomever will be rocking this and measure/cut accordingly.
 Step 1 for sewing was to attach the straps. I pinned each equal distance from the seam.  I did a 'Square' around the edges of the portion connected to the top.  


Next, I cut the frill off the back of the back piece of the top. I left enough fabric to layer it behind the existing one on the front of the top.  I pinned it about an inch above the existing seam of the other frill.   

I sewed the two together by sewing exactly at the existing seam on the front to hide the new seam of the extra frill. Much easier than seam ripping it and starting from scratch. 

 Loved the layered look!
 Then I flipped it over and trimmed down any excess fabric.
 Next, I began to pin the seams. I planned to do a 1/4 inch basic seam so I pinned accordingly.
 And the sewing began... an exact 1/4 inch seam.. removing pins along the way.
 After I finished all of the edges.. I places my original straps across the center portion to use as the tie waist... It originally had button holes so I placed those in the middle overlapping them slightly - with the intent to sew the buttons into the middle as embellishment.

A little snipping of strings, some sewing of tie ends, etc. - ad we were done! A shirt - made into a child's apron! 

The backside:


Hopefully that helps - and the further I get into this blogging thing the better I get at explaining/photos.

Questions? Ask away! I will do my best to help!

Sincerely,
Kristin